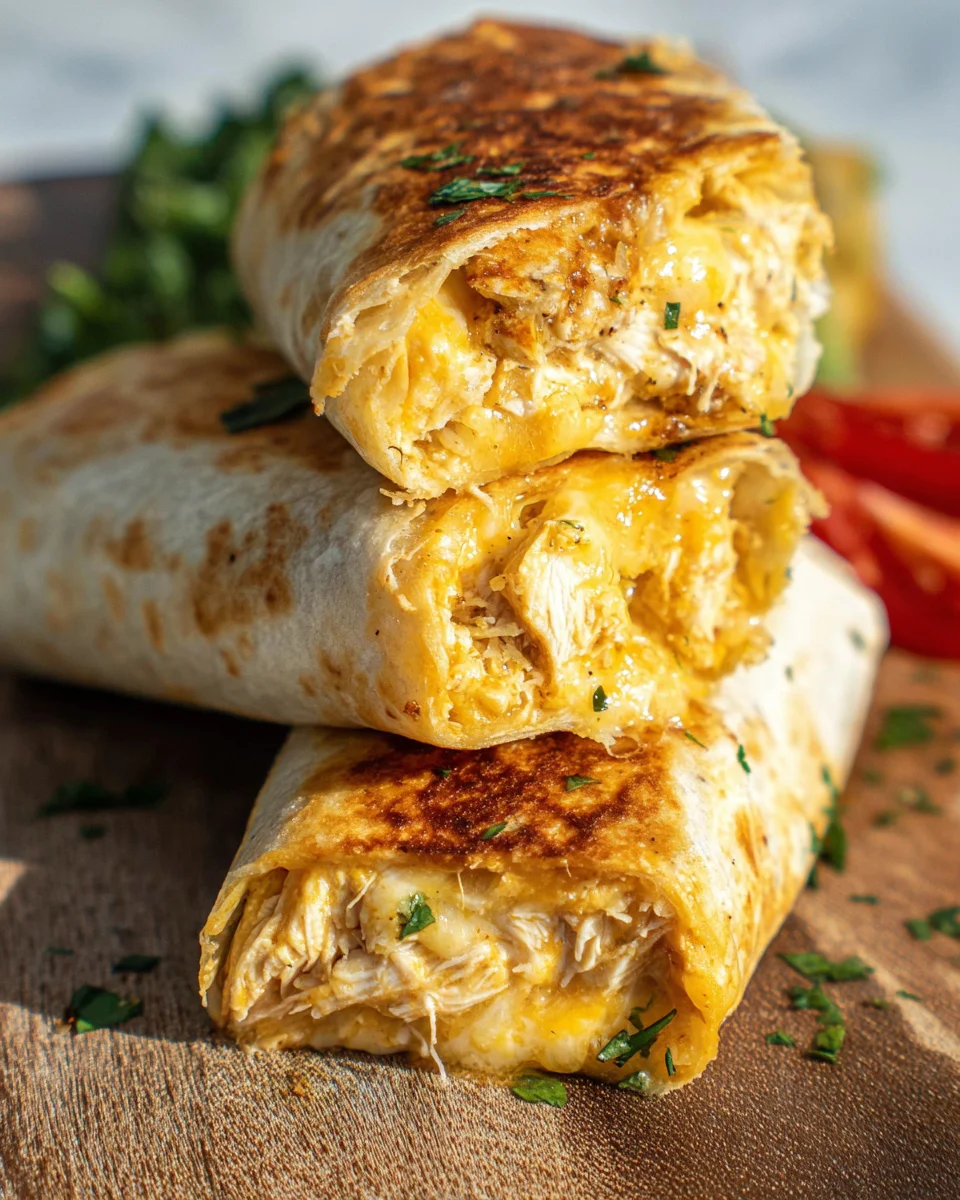
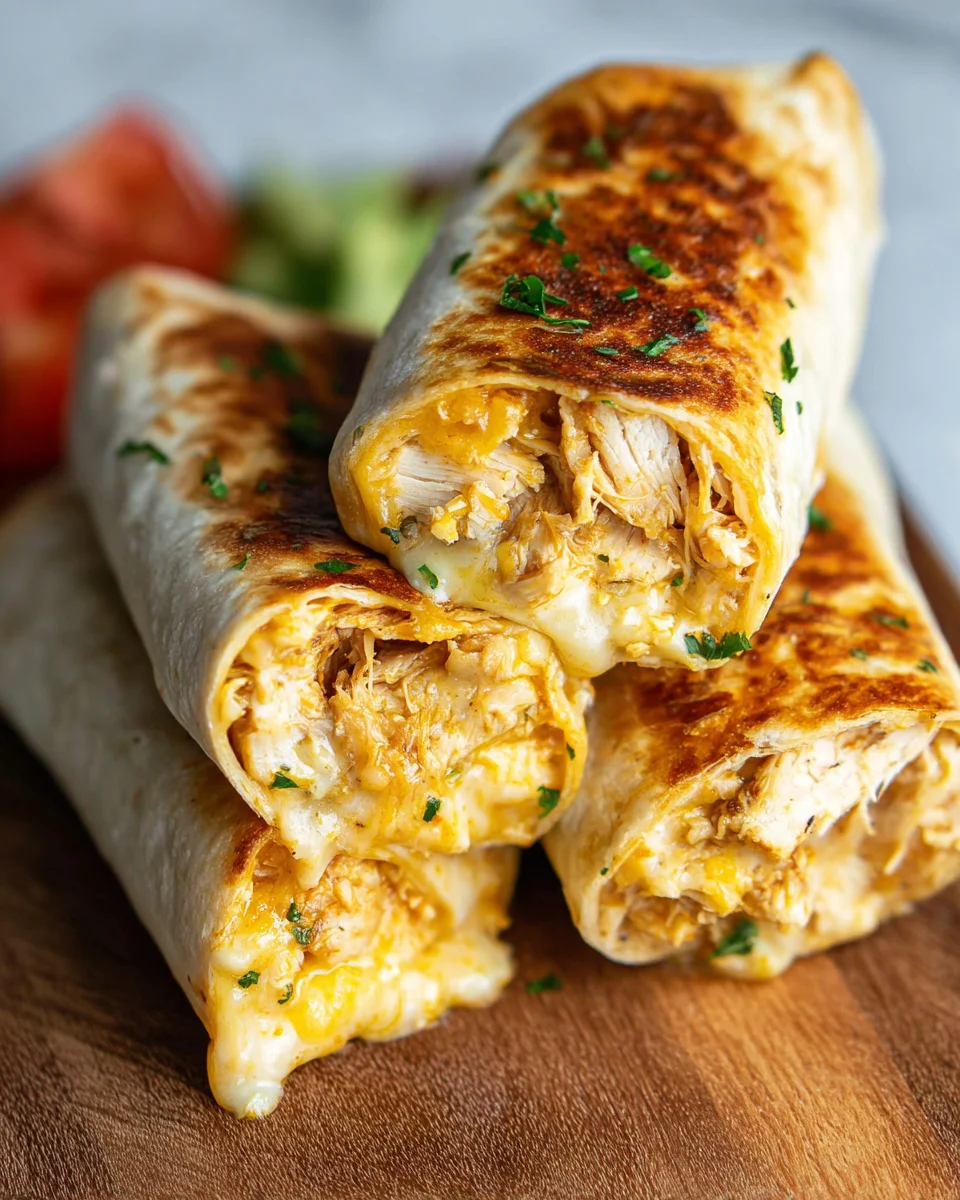
These Cheesy Garlic Chicken Wraps are a delightful meal option, perfect for lunch or dinner. The combination of juicy chicken, melted cheese, and aromatic garlic creates an irresistible flavor that is both satisfying and comforting. Whether you’re preparing a quick weeknight meal or packing something delicious for a picnic, these wraps are versatile enough to fit any occasion. Plus, they can be customized with your favorite toppings, making them an instant family favorite.
Jump to:
- Why You’ll Love This Recipe
- Tools and Preparation
- Essential Tools and Equipment
- Importance of Each Tool
- Ingredients
- For the Chicken Filling
- For Assembling the Wraps
- For Toasting
- How to Make Cheesy Garlic Chicken Wraps
- Step 1: Prepare the Garlic Chicken Filling
- Step 2: Assemble the Wraps
- Step 3: Fold and Toast the Wraps
- Step 4: Cook the Wraps
- How to Serve Cheesy Garlic Chicken Wraps
- Pair with Dipping Sauces
- Add Fresh Sides
- Make it a Meal
- How to Perfect Cheesy Garlic Chicken Wraps
- Best Side Dishes for Cheesy Garlic Chicken Wraps
- Common Mistakes to Avoid
- Storage & Reheating Instructions
- Refrigerator Storage
- Freezing Cheesy Garlic Chicken Wraps
- Reheating Cheesy Garlic Chicken Wraps
- Frequently Asked Questions
- How can I customize my Cheesy Garlic Chicken Wraps?
- Can I use store-bought rotisserie chicken?
- What dipping sauces go well with Cheesy Garlic Chicken Wraps?
- How do I make these wraps healthier?
- Can I prepare these wraps ahead of time?
- Final Thoughts
- 📖 Recipe Card
Why You’ll Love This Recipe
- Quick and Easy: With minimal prep time and simple steps, you can have a delicious meal ready in just 25 minutes.
- Flavor Packed: The blend of garlic, herbs, and cheese elevates the wraps to a whole new level of taste.
- Customizable: Feel free to substitute ingredients based on your preferences or pantry staples.
- Perfect for Meal Prep: These wraps can be made ahead of time and reheated for a quick lunch or dinner.
- Kid-Friendly: The cheesy goodness is sure to please even the pickiest eaters at the table.
Tools and Preparation
Before diving into making these Cheesy Garlic Chicken Wraps, gather the necessary tools. Having the right equipment will ensure a smooth cooking process.
Essential Tools and Equipment
- Skillet
- Mixing bowl
- Spatula
- Basting brush
Importance of Each Tool
- Skillet: A good skillet ensures even cooking and can help achieve that crispy texture on the outside of the wraps.
- Mixing Bowl: This is essential for combining your ingredients smoothly without any mess.
- Spatula: Use this tool to flip the wraps carefully without spilling their delicious contents.
- Basting Brush: Perfect for applying butter and garlic mixture evenly over the wraps for extra flavor.
Ingredients
For the Chicken Filling
- 2 cups cooked chicken, shredded (rotisserie chicken works well)
- 2 cloves garlic, minced
- 1 tablespoon olive oil
- 1 teaspoon dried oregano
- 1 teaspoon smoked paprika
- ½ teaspoon salt
- ¼ teaspoon black pepper
For Assembling the Wraps
- 4 large flour tortillas
- 1½ cups shredded mozzarella cheese
- ½ cup shredded cheddar cheese
- 2 tablespoons fresh parsley, chopped (optional)
For Toasting
- 2 tablespoons unsalted butter, melted
- 1 clove garlic, minced
How to Make Cheesy Garlic Chicken Wraps
Step 1: Prepare the Garlic Chicken Filling
- Heat olive oil in a skillet over medium heat.
- Add minced garlic and cook for 30 seconds until fragrant.
- Stir in shredded chicken along with oregano, smoked paprika, salt, and pepper.
- Cook for 3–4 minutes while stirring occasionally until the chicken is warmed through and nicely coated with seasonings. Set aside.
Step 2: Assemble the Wraps
- Lay a tortilla flat on a clean surface.
- Sprinkle a mix of mozzarella and cheddar cheese over the center of the tortilla.
- Add a generous scoop of the garlic chicken mixture on top of the cheese.
- Sprinkle with additional cheese and optional parsley if desired.
Step 3: Fold and Toast the Wraps
- Fold the sides of the tortilla inward then roll it up tightly like a burrito.
- In a small bowl, mix melted butter with minced garlic; brush this mixture evenly over each wrap.
Step 4: Cook the Wraps
- Heat a large skillet or griddle over medium heat.
- Place each wrap seam-side down in the skillet; cook for 2–3 minutes on each side until golden brown and crispy.
- Serve immediately with your favorite dipping sauce such as ranch or marinara.
Enjoy your homemade Cheesy Garlic Chicken Wraps! These tasty treats are sure to become a go-to recipe in your household!
How to Serve Cheesy Garlic Chicken Wraps
These Cheesy Garlic Chicken Wraps are versatile and can be enjoyed in various ways. Whether you want a light lunch or a hearty dinner, these wraps are perfect for any meal. Here are some serving suggestions to elevate your experience.
Pair with Dipping Sauces
- Ranch Dressing: Creamy ranch adds a cool contrast to the warm, cheesy wraps.
- Marinara Sauce: A classic choice, marinara complements the garlic flavors beautifully.
- Buffalo Sauce: For a spicy kick, drizzle some buffalo sauce on your wraps.
Add Fresh Sides
- Mixed Green Salad: A refreshing salad with vinaigrette balances the richness of the wraps.
- Coleslaw: Crunchy coleslaw provides a satisfying texture and extra flavor.
- Guacamole: Creamy guacamole enhances the wraps with its rich taste.
Make it a Meal
- Soup: Pair your wraps with tomato or chicken soup for a comforting combo.
- Sweet Potato Fries: Crispy sweet potato fries offer a delightful contrast to the cheesy filling.
How to Perfect Cheesy Garlic Chicken Wraps
To make your Cheesy Garlic Chicken Wraps even better, consider these helpful tips. Each tip will guide you in achieving the best flavor and texture.
- Use Fresh Ingredients: Fresh herbs and quality cheese enhance the overall flavor of your wraps.
- Don’t Overfill: Keep fillings moderate to prevent spills when rolling up the wraps.
- Toast until Golden Brown: Ensure you cook them until they are golden brown for added crispiness.
- Experiment with Cheese Blends: Mix mozzarella with pepper jack or gouda for different flavors and textures.
- Let Them Rest: Allow the wrapped tortillas to sit for a minute after cooking; this helps flavors meld together.
- Customize Seasonings: Adjust garlic or spice levels according to your taste preferences for a personalized touch.
Best Side Dishes for Cheesy Garlic Chicken Wraps
Pairing side dishes with your Cheesy Garlic Chicken Wraps can enhance your meal. Here are some delicious options that complement their flavors perfectly.
- Garlic Bread: A savory side that echoes the garlic notes in your wraps, great for dipping in sauces.
- Caesar Salad: Crisp romaine lettuce topped with parmesan and croutons adds crunch and freshness.
- Roasted Vegetables: Seasonal veggies roasted with olive oil provide color and nutrients alongside your meal.
- Macaroni Salad: Creamy macaroni salad is a comforting classic that pairs well with wraps.
- Potato Wedges: Crispy potato wedges seasoned with herbs make for a satisfying crunchy side.
- Cucumber Salad: A light cucumber salad dressed in vinegar offers a refreshing contrast to the rich wraps.
- Chips and Salsa: Crunchy tortilla chips served with fresh salsa add an enjoyable texture dynamic.
- Fruit Salad: A colorful fruit salad brings sweetness that balances out the savory flavors of the wraps.
Common Mistakes to Avoid
Making Cheesy Garlic Chicken Wraps can be simple, but avoiding common mistakes will ensure they’re perfect every time.
- Using cold chicken: Always use warm or room temperature chicken for better flavor and texture. Cold chicken can make your wraps soggy.
- Overfilling the wraps: It’s tempting to add a lot of filling, but overstuffed wraps can tear easily. Stick to a moderate amount to keep them intact.
- Skipping the seasoning: Don’t forget to season your chicken properly with spices. This enhances the flavor and makes your wraps more delicious.
- Not toasting the wraps: Toasting gives the wraps a crispy exterior. Skipping this step can result in a soft, less appealing wrap.
- Neglecting the dipping sauce: A tasty dipping sauce complements the Cheesy Garlic Chicken Wraps perfectly. Choose something like ranch or marinara for added flavor.
Storage & Reheating Instructions
Refrigerator Storage
- Store Cheesy Garlic Chicken Wraps in an airtight container.
- They can last in the refrigerator for up to 3 days.
Freezing Cheesy Garlic Chicken Wraps
- Wrap each individually in plastic wrap and place them in a freezer-safe bag.
- They can be frozen for up to 2 months for best quality.
Reheating Cheesy Garlic Chicken Wraps
- Oven: Preheat to 350°F (175°C). Place wraps on a baking sheet and heat for 10-15 minutes until warmed through.
- Microwave: Place on a microwave-safe plate, cover with a damp paper towel, and heat for 1-2 minutes until hot.
- Stovetop: Heat a skillet over medium heat. Cook wraps seam-side down for about 2-3 minutes on each side until crispy.
Frequently Asked Questions
How can I customize my Cheesy Garlic Chicken Wraps?
You can add your favorite vegetables like bell peppers or spinach. Experiment with different cheeses such as pepper jack for extra spice!
Can I use store-bought rotisserie chicken?
Yes! Using rotisserie chicken saves time and adds great flavor. Just shred it before adding to your wraps.
What dipping sauces go well with Cheesy Garlic Chicken Wraps?
Ranch dressing, marinara sauce, or even spicy salsa complement these wraps beautifully. Choose based on your preference!
How do I make these wraps healthier?
Opt for whole wheat tortillas or add more veggies to increase fiber and nutrients while reducing calories.
Can I prepare these wraps ahead of time?
Absolutely! You can assemble them in advance and store them in the fridge until you’re ready to toast and serve.
Final Thoughts
Cheesy Garlic Chicken Wraps are not only quick and easy but also versatile. You can customize them with your favorite ingredients or sauces. Whether it’s a busy weeknight dinner or a lunch on-the-go, these wraps are sure to satisfy any craving. Give them a try today!
Did You Enjoy Making This Recipe? Please rate this recipe with ⭐⭐⭐⭐⭐ or leave a comment.
📖 Recipe Card
Print
Cheesy Garlic Chicken Wraps
- Total Time: 25 minutes
- Yield: Serves 4
Description
Cheesy Garlic Chicken Wraps are a delicious, quick meal that’s perfect for lunch or dinner. With juicy shredded chicken, melted cheese, and aromatic garlic all wrapped in a warm tortilla, these wraps are not just satisfying but also customizable to suit your taste. Whether you need a fast weeknight dinner or a delightful picnic treat, these wraps are versatile and family-friendly. Plus, they can be made in just 25 minutes!
Ingredients
- 2 cups cooked chicken (shredded)
- 4 large flour tortillas
- 1½ cups mozzarella cheese (shredded)
- ½ cup cheddar cheese (shredded)
- 2 cloves garlic (minced)
- 1 tablespoon olive oil
- Spices: oregano, smoked paprika, salt, black pepper
- 2 tablespoons unsalted butter (melted)
Instructions
- Heat olive oil in a skillet over medium heat. Add minced garlic and sauté for 30 seconds.
- Stir in shredded chicken with oregano, smoked paprika, salt, and pepper; cook for 3–4 minutes until heated through.
- Lay a tortilla flat, sprinkle with cheeses, add chicken mixture, and fold tightly.
- Brush the wrap with melted butter mixed with minced garlic.
- Cook on each side in a skillet for 2–3 minutes until golden brown.
- Prep Time: 10 minutes
- Cook Time: 15 minutes
- Category: Main
- Method: Frying
- Cuisine: American
Nutrition
- Serving Size: 1 wrap (180g)
- Calories: 430
- Sugar: 2g
- Sodium: 830mg
- Fat: 24g
- Saturated Fat: 10g
- Unsaturated Fat: 12g
- Trans Fat: 0g
- Carbohydrates: 33g
- Fiber: 2g
- Protein: 26g
- Cholesterol: 90mg
