Red White and Blue Popsicles are the perfect summer treat, bursting with vibrant colors and refreshing flavors. These patriotic popsicles are not only visually appealing but also healthy and easy to make. Ideal for barbecues, picnics, or just a sunny day by the pool, they offer a delicious way to celebrate summer. With layers of fruity goodness and creamy coconut, these popsicles will keep you cool while impressing your friends and family.

Jump to:
- Why You’ll Love This Recipe
- Tools and Preparation
- Essential Tools and Equipment
- Importance of Each Tool
- Ingredients
- For the Red Layer
- For the White Layer
- For the Blue Layer
- How to Make Red White and Blue Popsicles
- Step 1: Prepare the Red Layer
- Step 2: Make the White Layer
- Step 3: Create the Blue Layer
- Step 4: Enjoy Your Popsicles!
- How to Serve Red White and Blue Popsicles
- At a Summer BBQ
- As a Fun Snack for Kids
- For a Patriotic Celebration
- With Fresh Fruit Sides
- In Party Favors
- How to Perfect Red White and Blue Popsicles
- Best Side Dishes for Red White and Blue Popsicles
- Common Mistakes to Avoid
- Storage & Reheating Instructions
- Refrigerator Storage
- Freezing Red White and Blue Popsicles
- Reheating Red White and Blue Popsicles
- Frequently Asked Questions
- Can I use fresh fruit instead of frozen?
- How do I achieve vibrant colors?
- Can I customize the flavors?
- Are these popsicles healthy?
- What if I don’t have blue spirulina?
- Final Thoughts
- 📖 Recipe Card
Why You’ll Love This Recipe
- Easy to Make: With simple ingredients and straightforward steps, you can whip these up quickly.
- Perfect for Any Occasion: These popsicles are great for parties, holidays, or just a fun summer snack.
- Healthy Ingredients: Made with fresh fruits and coconut milk, they’re a guilt-free treat.
- Visually Stunning: The red, white, and blue layers make them a festive addition to any gathering.
- Customizable Flavors: Feel free to experiment with different fruits or sweeteners based on your preferences.
Tools and Preparation
Before diving into the recipe, gather your tools to ensure a smooth process. Having the right equipment makes all the difference when creating these delightful popsicles.
Essential Tools and Equipment
- Ice pop molds
- High-speed blender
- Measuring cups
- Measuring spoons
Importance of Each Tool
- Ice pop molds: Essential for shaping your popsicles into fun forms.
- High-speed blender: Ensures that your fruit blends smoothly for a creamy texture in each layer.
Ingredients
For the Red Layer
- 1 cup raspberries
- 1 tbsp maple syrup (optional)
- 1-2 tbsp water
For the White Layer
- 1 cup canned coconut milk
- 1 tbsp maple syrup (optional)
For the Blue Layer
- ¼ tsp blue spirulina powder
- 1 cup coconut milk
- 1 tbsp maple syrup (optional)
- ¼ cup blueberries (optional; will turn purple blue if added)
How to Make Red White and Blue Popsicles
Step 1: Prepare the Red Layer
- Combine the raspberries, maple syrup, and water in a high-speed blender.
- Blend until very smooth.
- Pour about 1 ½ tablespoons of this mixture into each of the 6 ice pop molds.
- Place the molds in the freezer to set for at least 30 minutes.
Step 2: Make the White Layer
- While the red layer is freezing, rinse out your blender.
- Combine the coconut milk and maple syrup in the clean blender.
- Blend until smooth.
- Once the red layer has set, add heaping 1 – 1 ½ tablespoons of this white mixture to each mold.
- Return the molds to the freezer for at least 2 hours.
Step 3: Create the Blue Layer
- In your rinsed-out blender, combine coconut milk, blue spirulina, and maple syrup.
- Blend until smooth.
- Remove molds from the freezer once the white layer is set.
- Add the blue layer on top of each mold.
- Insert a popsicle stick into each mold and freeze until firm, about 5 hours.
Step 4: Enjoy Your Popsicles!
To remove your popsicles from their molds:
1. Run them under hot water for about 10 seconds.
2. Serve frozen and enjoy! Store any remaining popsicles in the freezer for up to a month.
Now you’re ready to savor these vibrant Red White and Blue Popsicles!
How to Serve Red White and Blue Popsicles
Red White and Blue Popsicles are not only a delicious treat but also a festive option for summer gatherings. Here are some creative serving suggestions to make your popsicles even more enjoyable.
At a Summer BBQ
- Serve these popsicles as a refreshing dessert alongside grilled meats and vegetables. Their vibrant colors will add a festive touch to your table.
As a Fun Snack for Kids
- Kids love colorful treats! Offer these popsicles as a healthy snack option on hot days. They can even help in the preparation process.
For a Patriotic Celebration
- Perfect for Independence Day, serve these popsicles at your Fourth of July gathering. They embody the red, white, and blue theme beautifully.
With Fresh Fruit Sides
- Pair your popsicles with fresh fruit like strawberries or watermelon for a balanced summer snack. This adds extra color and flavor to the experience.
In Party Favors
- Freeze small portions in mini molds and give them as party favors. Wrap them in cellophane and tie with a ribbon for a delightful surprise.

How to Perfect Red White and Blue Popsicles
Making the perfect Red White and Blue Popsicles requires attention to detail. Here are some tips to ensure they turn out great every time.
- Blend thoroughly: Ensure each layer is blended until smooth for the best texture.
- Freeze between layers: Allow sufficient freezing time between layers to prevent them from mixing.
- Use quality ingredients: Fresh or high-quality ingredients enhance flavor significantly.
- Adjust sweetness: Taste each layer before freezing; you can always add more maple syrup if needed.
- Experiment with flavors: Feel free to swap fruits or adjust spirulina levels for different tastes.
- Serve immediately: These popsicles are best enjoyed fresh from the freezer for optimal texture.
Best Side Dishes for Red White and Blue Popsicles
When serving Red White and Blue Popsicles, consider pairing them with delicious side dishes that complement their fruity flavors. Here are some excellent options:
- Grilled Chicken Skewers: Marinated chicken skewers grilled to perfection provide a savory contrast to sweet popsicles.
- Quinoa Salad: A light quinoa salad with cucumbers, tomatoes, and herbs adds freshness and complements the flavors of the popsicles.
- Fruit Salad: A mixed fruit salad enhances the fruity theme while providing additional vitamins and minerals.
- Veggie Platter: Crisp veggies like carrots, bell peppers, and cherry tomatoes create a crunchy side that balances sweetness.
- Caprese Salad: Fresh mozzarella, basil, and tomatoes drizzled with balsamic glaze offer an elegant touch that pairs well with summer treats.
- Corn on the Cob: Grilled or boiled corn on the cob adds a classic summer element that everyone loves.
- Potato Wedges: Seasoned potato wedges provide heartiness, making them an ideal companion for fruity desserts.
- Pasta Salad: A cold pasta salad with Italian dressing brings additional flavor diversity to your meal spread.
Common Mistakes to Avoid
Creating Red White and Blue Popsicles can be a fun process, but there are some common pitfalls to watch out for.
- Skipping the Freezing Time: Ensure each layer is fully frozen before adding the next. This helps maintain distinct layers.
- Overfilling the Molds: Avoid overflowing by not overfilling each mold. Leave a little space for expansion as they freeze.
- Not Using Quality Ingredients: Choose fresh or high-quality fruits and coconut milk. This ensures better flavor and texture in your popsicles.
- Ignoring Blending Consistency: Blend until very smooth for each layer. This prevents any graininess in your final popsicle.
- Using Too Much Sweetener: Taste the mixtures first and adjust sweeteners as needed. Too much can overpower the natural flavors of the fruits.
Storage & Reheating Instructions
Refrigerator Storage
- Store leftover popsicles in an airtight container for up to 1 week, although they are best enjoyed fresh.
- Keep them on a flat surface in your fridge to prevent melting.
Freezing Red White and Blue Popsicles
- These popsicles can be kept in the freezer for up to 1 month when stored properly.
- Use freezer-safe molds or airtight containers to maintain freshness.
Reheating Red White and Blue Popsicles
- Oven: Not recommended for popsicles, as they should be served frozen.
- Microwave: Briefly microwave for 10-15 seconds if you need to soften them slightly before serving.
- Stovetop: Again, not recommended; these treats are best enjoyed straight from the freezer.
Frequently Asked Questions
If you have questions about making these delicious Red White and Blue Popsicles, you’re not alone!
Can I use fresh fruit instead of frozen?
Yes, fresh fruit works great! Just make sure to blend it well for a smooth texture.
How do I achieve vibrant colors?
Using ripe fruits will give you bright colors. Also, avoid mixing too much between layers.
Can I customize the flavors?
Absolutely! Feel free to swap berries or add different fruits for unique flavors while keeping the layering technique.
Are these popsicles healthy?
Yes! They are made with natural ingredients like fruits and coconut milk, making them a healthier alternative to store-bought treats.
What if I don’t have blue spirulina?
You can use blueberry puree or other blue-hued fruits as a substitute if spirulina is unavailable.
Final Thoughts
These Red White and Blue Popsicles are not only visually appealing but also refreshing and healthy. They’re perfect for summer gatherings or family snacks. Try customizing your layers with different fruits or adding yogurt for creaminess. Enjoy experimenting with this versatile recipe!
Did You Enjoy Making This Recipe? Please rate this recipe with ⭐⭐⭐⭐⭐ or leave a comment.
📖 Recipe Card
Print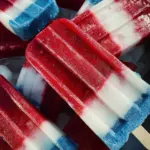
Red White and Blue Popsicles
- Total Time: 0 hours
- Yield: Makes approximately six popsicles 1x
Description
Cool down this summer with vibrant Red White and Blue Popsicles, a delightful treat that perfectly captures the spirit of the season. Bursting with colorful layers of fresh raspberries, creamy coconut milk, and nutritious blue spirulina, these popsicles are not only a feast for the eyes but also a healthy option for warm days. Easy to make and customizable with your favorite fruits, they are perfect for barbecues, picnics, or just lounging by the pool. Impress your friends and family with these refreshing frozen delights that celebrate summer in every bite.
Ingredients
- 1 cup raspberries
- 1 tbsp maple syrup (optional)
- 1–2 tbsp water
- 1 cup canned coconut milk
- ¼ tsp blue spirulina powder
- 1 cup coconut milk
- 1 tbsp maple syrup (optional)
- ¼ cup blueberries (optional; will turn purple blue if added)
Instructions
- For the red layer: Blend raspberries, maple syrup (if using), and water until smooth. Pour into molds and freeze for 30 minutes.
- For the white layer: Blend coconut milk and maple syrup (if using) until smooth. Add to molds after red layer has set, then freeze for at least 2 hours.
- For the blue layer: Blend coconut milk, blue spirulina, and maple syrup (if using) until smooth. Top off the molds with this mixture and insert sticks; freeze for 5 hours or until firm.
- To serve: Run molds under hot water for a few seconds to release popsicles.
- Prep Time: 15 minutes
- Cook Time: Freezing time varies
- Category: Dessert
- Method: Freezing
- Cuisine: American
Nutrition
- Serving Size: 1 serving
- Calories: 55
- Sugar: 9g
- Sodium: 5mg
- Fat: 2g
- Saturated Fat: 2g
- Unsaturated Fat: 0g
- Trans Fat: 0g
- Carbohydrates: 12g
- Fiber: 1g
- Protein: 1g
- Cholesterol: 0mg
