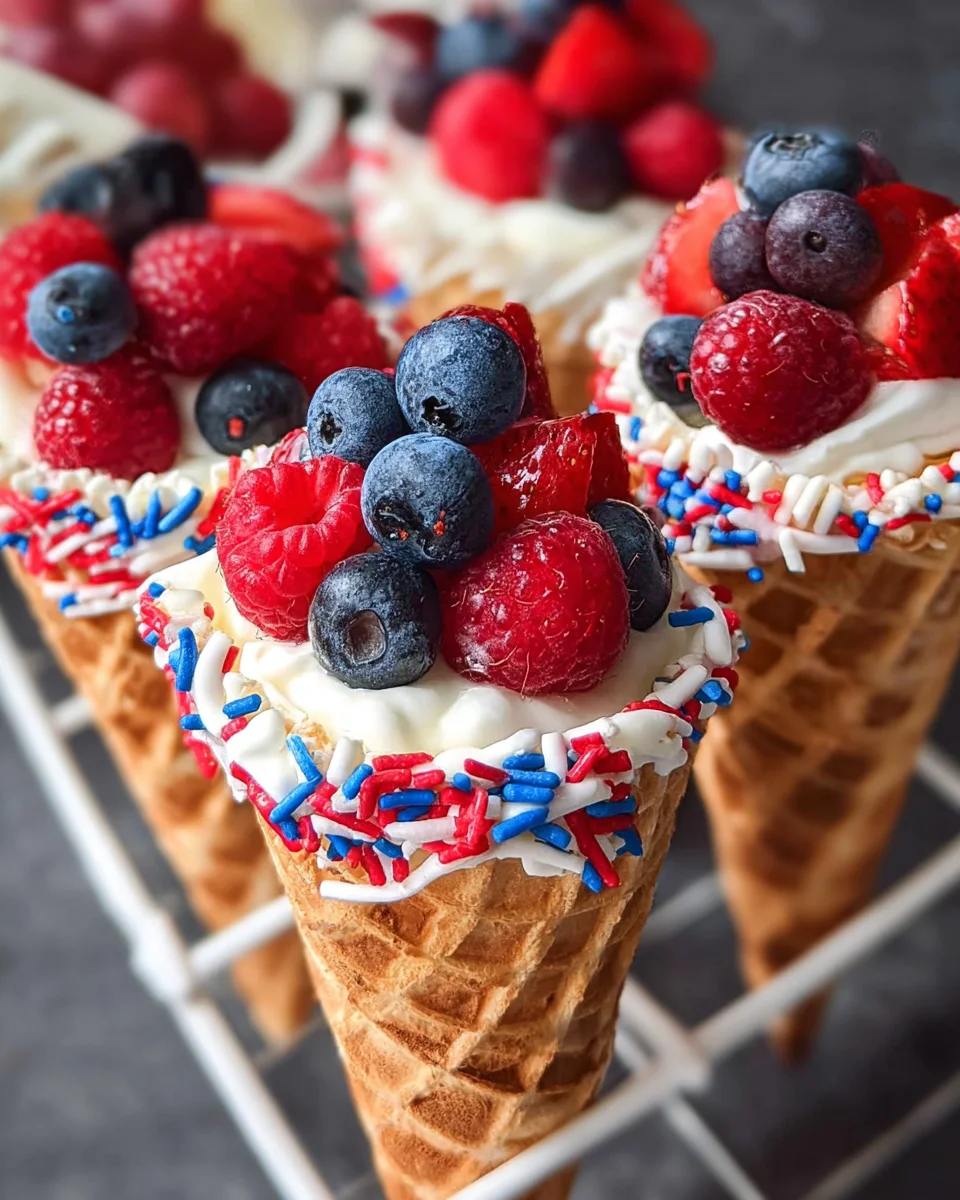
Patriotic Fruit Cones are a delightful and healthy dessert option that adds a splash of color to any summer gathering or 4th of July celebration. These fun cones, filled with fresh berries and creamy yogurt, are not only visually appealing but also easy to prepare. Perfect for kids and adults alike, they offer a delicious way to enjoy seasonal fruits while keeping things festive and light.
Jump to:
- Why You’ll Love This Recipe
- Tools and Preparation
- Essential Tools and Equipment
- Importance of Each Tool
- Ingredients
- For the Chocolate Coating
- For the Cones
- For the Filling
- How to Make Patriotic Fruit Cones
- Step 1: Melt the Chocolate
- Step 2: Prepare the Waffle Cones
- Step 3: Add Sprinkles
- Step 4: Layer Yogurt and Fruit
- Step 5: Serve Chill
- How to Serve Patriotic Fruit Cones
- Individual Treats
- Festive Display
- Party Favors
- Ice Cream Cone Bar
- Themed Drink Pairing
- How to Perfect Patriotic Fruit Cones
- Best Side Dishes for Patriotic Fruit Cones
- Common Mistakes to Avoid
- Storage & Reheating Instructions
- Refrigerator Storage
- Freezing Patriotic Fruit Cones
- Reheating Patriotic Fruit Cones
- Frequently Asked Questions
- What are Patriotic Fruit Cones?
- How long do Patriotic Fruit Cones last?
- Can I customize my Patriotic Fruit Cones?
- Are Patriotic Fruit Cones healthy?
- Can kids help make Patriotic Fruit Cones?
- Final Thoughts
- 📖 Recipe Card
Why You’ll Love This Recipe
- Colorful Presentation: The vibrant red, white, and blue colors make these cones an eye-catching treat for any occasion.
- Healthy Option: Packed with fresh fruits and yogurt, these cones are a nutritious alternative to traditional desserts.
- Quick Preparation: With only 15 minutes of prep time, you can whip up these cones in no time!
- Kid-Friendly: Kids will love assembling their own cones, making it a fun activity for family gatherings.
- Versatile Ingredients: Feel free to mix and match fruits based on what’s in season or your personal favorites.
Tools and Preparation
To make the preparation of Patriotic Fruit Cones simple and enjoyable, gather your essential tools before you start. Having everything ready will speed up the process and ensure you don’t miss any steps.
Essential Tools and Equipment
- Mixing bowls
- Small heat-safe bowl
- Baking sheet or plate
- Heavy cups or bowls (for holding cones)
- Spoon
Importance of Each Tool
- Mixing bowls: Perfect for combining ingredients without making a mess.
- Small heat-safe bowl: Ideal for melting chocolate safely in the microwave or using a double boiler.
- Heavy cups or bowls: Useful for stabilizing your waffle cones while decorating them.
Ingredients
To create your delicious Patriotic Fruit Cones, gather the following ingredients:
For the Chocolate Coating
- 1 cup White chocolate melting wafers or chips
For the Cones
- 6 waffle cones
- ¼ cup red and blue sugar sprinkles
- 6 vanilla pirouette cream-filled wafers
For the Filling
- 2 cups white yogurt (unflavored or vanilla)
- 1 cup raspberries
- 1 cup blueberries
- 1 cup small strawberries
How to Make Patriotic Fruit Cones
Step 1: Melt the Chocolate
- Melt the white chocolate melting wafers in a small heat-safe bowl according to the package directions.
- Ensure that the chocolate is smooth and fully melted before proceeding.
Step 2: Prepare the Waffle Cones
- Dip the top of each waffle cone into the melted white chocolate about an inch down.
- Hold each cone above the bowl to allow excess chocolate to drip back into the bowl.
Step 3: Add Sprinkles
- Quickly sprinkle each white-covered cone top with red and blue sugar sprinkles over a small plate to catch any that fall.
- Place them upright in heavy cups or bowls as holders.
- Refrigerate for 10 minutes until the white chocolate hardens.
Step 4: Layer Yogurt and Fruit
- Once hardened, layer your fruit, such as raspberries, blueberries, and small strawberries, between layers of yogurt, ending with fruit on top for a beautiful finish.
Step 5: Serve Chill
- Serve your Patriotic Fruit Cones chilled, perfect for hot summer days!
Enjoy these fun treats as part of your festive celebrations!
How to Serve Patriotic Fruit Cones
These Patriotic Fruit Cones are not just a delight to the taste buds but also a feast for the eyes. Perfect for any summer gathering or 4th of July celebration, they can be served in various creative ways.
Individual Treats
- Each guest gets their own cone for a personalized dessert.
- Set up a self-serve station with different fruit options and toppings.
Festive Display
- Arrange the cones in a star-shaped pattern on a large platter.
- Use colorful napkins and plates that match the patriotic theme.
Party Favors
- Wrap individual cones in cellophane tied with red, white, and blue ribbons.
- These make great take-home treats after your summer BBQ.
Ice Cream Cone Bar
- Create a fun ice cream cone bar by adding scoops of yogurt or ice cream.
- Let guests top their cones with assorted fruits and sprinkles.
Themed Drink Pairing
- Serve with themed beverages like cherry lemonade or blueberry iced tea.
- This adds to the festive atmosphere while complementing the flavors of the cones.

How to Perfect Patriotic Fruit Cones
Creating the perfect Patriotic Fruit Cones is easy with just a few helpful tips. Follow these suggestions for best results.
- Use Fresh Fruits: Choose ripe, seasonal berries for better flavor and texture.
- Chill Ingredients: Keep yogurt and fruits in the refrigerator until ready to assemble for extra freshness.
- Melt Chocolate Carefully: Use low heat when melting white chocolate to prevent burning.
- Layer Strategically: Alternate layers of yogurt and fruit for an appealing look when serving.
- Limit Sprinkles: Don’t overdo it with sprinkles; just enough to add color without overwhelming the taste.
- Serve Immediately: Enjoy them right after assembly for optimal crunch from the cones.
Best Side Dishes for Patriotic Fruit Cones
To complement your Patriotic Fruit Cones, consider serving some delicious side dishes. Here are some great options:
- Caprese Skewers: Fresh mozzarella, tomatoes, and basil drizzled with balsamic glaze; colorful and refreshing.
- Grilled Corn Salad: Sweet corn mixed with bell peppers, cilantro, and lime juice; perfect for summer gatherings.
- Potato Salad: A creamy classic that pairs well with any outdoor meal; make it ahead for convenience.
- Veggie Platter: Crisp vegetables served with ranch dip; provides a healthy crunch alongside sweet desserts.
- Mini Hot Dogs: Bite-sized sausages wrapped in dough; fun finger food that guests will love at barbecues.
- Fruit Kabobs: Skewered pieces of various fruits; they’re colorful and echo the theme of your main dessert.
Common Mistakes to Avoid
To ensure your Patriotic Fruit Cones turn out perfectly, keep these common mistakes in mind.
- Skipping the Chocolate: Not dipping the cones in white chocolate can lead to a less festive look. Always dip at least an inch down for a fun presentation.
- Overloading on Fruit: Adding too much fruit can make the cones unstable. Layer fruits and yogurt carefully to maintain structure.
- Using Warm Ingredients: If your yogurt or melted chocolate is too warm, it may cause the cones to become soggy. Allow ingredients to cool before assembly.
- Neglecting Chill Time: Failing to chill the cones after decorating can result in melted chocolate. Be sure to refrigerate them for at least 10 minutes before serving.
- Forgetting Portion Control: These cones are tasty! Remember that each serves as a single portion, so avoid filling them too much.
Storage & Reheating Instructions
Refrigerator Storage
- Store any leftover Patriotic Fruit Cones in an airtight container.
- They will last up to 2 days; however, they are best eaten fresh.
Freezing Patriotic Fruit Cones
- Freezing is not recommended as it may alter the texture of the yogurt and fruit.
- If you must freeze them, wrap each cone tightly in plastic wrap and place them in a freezer-safe bag for up to 1 month.
Reheating Patriotic Fruit Cones
- Oven: Preheat to 350°F (175°C). Place cones on a baking sheet for about 5 minutes just to warm slightly but not recommended for yogurt-filled cones.
- Microwave: Heat for 10-15 seconds if necessary. Be cautious not to melt the chocolate too much.
- Stovetop: Not suitable for these cones due to potential melting issues with yogurt and chocolate.
Frequently Asked Questions
What are Patriotic Fruit Cones?
Patriotic Fruit Cones are a fun dessert made with waffle cones filled with layers of yogurt and fresh berries, perfect for celebrating occasions like the 4th of July.
How long do Patriotic Fruit Cones last?
These delicious treats are best enjoyed fresh but can be stored in the refrigerator for up to 2 days.
Can I customize my Patriotic Fruit Cones?
Absolutely! You can substitute different fruits or use flavored yogurt to create your own unique version of Patriotic Fruit Cones.
Are Patriotic Fruit Cones healthy?
Yes! Packed with fruit and yogurt, these cones offer a healthier dessert option compared to traditional sweets, making them a great choice for summer gatherings.
Can kids help make Patriotic Fruit Cones?
Definitely! This recipe is kid-friendly and allows children to assist with layering fruit and yogurt, making it a fun activity for everyone.
Final Thoughts
Patriotic Fruit Cones are not only visually appealing but also versatile and easy to customize. With their refreshing flavors and festive presentation, they make an excellent choice for summer parties or holiday celebrations. Don’t hesitate to get creative with your favorite fruits and yogurts!
Did You Enjoy Making This Recipe? Please rate this recipe with ⭐⭐⭐⭐⭐ or leave a comment.
📖 Recipe Card
Print
Patriotic Fruit Cones
- Total Time: 0 hours
- Yield: Makes 6 servings 1x
Description
Enjoy refreshing Patriotic Fruit Cones filled with berries and yogurt! Perfect for summer gatherings. Try this easy recipe today!
Ingredients
- 1 cup white chocolate melting wafers
- 6 waffle cones
- ¼ cup red and blue sugar sprinkles
- 2 cups yogurt (unflavored or vanilla)
- 1 cup raspberries
- 1 cup blueberries
- 1 cup small strawberries
Instructions
- Melt white chocolate in a heat-safe bowl according to package directions until smooth.
- Dip the top inch of each waffle cone into the melted chocolate, allowing excess to drip off.
- Sprinkle red and blue sugar sprinkles on top while still wet, then place cones upright in heavy cups or bowls.
- Refrigerate for about 10 minutes until chocolate hardens.
- Once set, layer yogurt and assorted fruits inside each cone, finishing with more fruit on top.
- Serve chilled for a refreshing treat.
- Prep Time: 15 minutes
- Cook Time: None
- Category: Dessert
- Method: No cooking required
- Cuisine: American
Nutrition
- Serving Size: 1 cone (120g)
- Calories: 180
- Sugar: 18g
- Sodium: 50mg
- Fat: 7g
- Saturated Fat: 4g
- Unsaturated Fat: 2g
- Trans Fat: 0g
- Carbohydrates: 27g
- Fiber: 2g
- Protein: 4g
- Cholesterol: 5mg
